Thursday, February 28, 2008
February 30-day Challenge Participants
Okay, here's the post. If you participated in the February 30-day Organizational Challenge please add the link of the direct post describing your before and after photos for the challenge.
Wednesday, February 27, 2008
Project Gauge
 To continue the topic of gauges I've put together a nice little chart for you to use when cataloging your gauge swatches. It seems that all kinds of things can be done with swatches, but for those of us that may tend to knit several of the same items or even knit different items using the same yarn, it is a good idea to catalog your gauge swatches so that you are not swatching redundantly. My absolutely favorite yarn to knit with is Lamb's Pride Bulky. I have felted many bags with this yarn, and I love the thickness of the felt and the shine of the yarn. I also like to use KnitPicks Wool of the Andes.
You can put your swatch into a ziplock bag and attach it to the page. Slip the entire thing into a page protector and keep your Gauge record in a 3-ring binder for further reference. If you can think of something else that I could include on this record just leave a comment and I'll be sure to update the page.
Tuesday, February 26, 2008
Space, Time, and Project Management
 Change isn't easy. I've been 'unventing' this simple truth ever since I signed up for the February 30-day Challenge. My goal - to organize my stash. I got inspiration from many of the posts to this group. What I came up against was that I couldn't simply reshuffle all my yarn into a new set of containers or buy another set of shelves. I had to work with what I had, which meant I had to rethink how I wanted to access my yarn, and the best set-up for doing this.
I approached this on two fronts: the yarn front, and the space front.
I decided to separate my stash into 3 groups: the Works In Progress; the Designated Yarn for a specific project-to-be; and Free Range Yarn. So, I unearthed almost all my WIPs and piled them in my bedroom; then I identified Designated Yarn and moved that into the dining room; which left the Free Range Yarn in the Front Room (used to be the living room). While the rest of my apartment was in shambles, I now had room to look more critically at the space in the Front Room and could now try to come up with a plan for arranging "the stash."
It was important to me to keep everything as visible as possible, so I could see what was waiting to be knit up, and also see what I still had to play with. I told myself to think outside the box, and came up with the idea of hanging WIPs in plastic bags from a metal shelving unit I have (pictures will be available at the end-of-challenge reveal). Ideally I should be able to walk around both sides of the shelving, so I will have to relocate it (thankfully, it's on wheels!). The cabinet for Free Range Yarn wasn't on wheels, and I first had to dismantle the shelf unit that was on top of it (for which I have plans in the dining-room-about-to-become-office/reading area). I emptied the cabinet (which is 6-feet long and about 3-feet high), removed the sliding glass doors, maneuvered sliders under each corner, and dragged it across the room to the outside wall where there are no plugs. The small computer desk was relocated where the cabinet had been, because both the telephone jack and an electrical outlet are on that wall.
I know this is not the most interesting chain of events, but in order to reorganize my stash, I needed to reorganize my space. And in order to reorganize my space, I needed a step-by-step plan. Even though I started working toward my goal of Organizing Stash at the beginning of the month, it took me almost 3 weeks to work out what needed to be done, and in what order things needed to be done, before I actually started the work.
This is the basis of Project Management - figure out what you have to do in fairly granular detail, and then do it. Don't leap in and start what you don't know how to finish. Always have a back-up plan for each step, in case what you thought would work doesn't (if it isn't obvious, I'm a Professional Project Manager, I can get points towards maintaining my certification for this project, if I wanted to).
After all this, the motto for this week's Organized Space blog post is: "take the time to carefully plan how best to use your space."
Suzanne
Swatches, swatches everywhere

Over at the OKC group at Ravelry, Jenean brought up the question of what to do with gauge swatches. It's hard for some of us to persuade ourselves to even knit swatches. I find it torture when I want to dive right into a new project to have to start instead by knitting at 4 x 4" square. (And maybe more than one, if the gauge isn't right on the first attempt.)
But let's assume we all actually knit swatches, as we should for most of our projects. What do we do with the little masterpieces once we're through with them?
I know that I've always been loath to throw them away. They're sort of nice to touch and look at. And they represent effort. But I can't recommend what I do with them--I cram them into the purse organizer that holds my hibernating knitting projects. Surely there's a better way.
I guess the answer is to examine why you keep the gauge swatch. If, as Jenean suggested, it's because you might use the same yarn with the same needles again, and you want to avoid having to re-knit your swatch, then keeping it makes sense. But it's imperative, in that case, to identify your little swatch. You need to indicate the yarn and needles used. Otherwise it's useless. But then what do you do with it?
A three-ring binder with sheet protectors makes sense to me. You could use secure sheet protectors to keep the swatch from falling out of the top of the notebook. Another thought would be a fisherman's worm binder (which is how I store my circular needles). Still another idea would be to put them in ziploc bags and store them in boxes or bins. You could also affix them to your knitting-project journal, but that'd make for a pretty lumpy journal.
Pondering this has made me question whether I should be keeping them at all. Do I just throw them away? I suppose I could stitch them together and make a little blanket for my cat to snuggle in. (Hey, that's not a bad idea!) The truth of the matter is that I've never referred to a gauge swatch after the project was over, so I think it's time for me to either think of a way to reuse them (my cat, Joe, who is supervising me as I write this, votes for the gauge-swatch-kitty-bed idea) or toss them.
In the Ravelry thread, Suzanne made the very good point that you should at minimum keep the gauge swatch until the project is finished, in case you run out of yarn and need to unravel it.
I'm making a vow to myself (and a note in my calendar) to do something about or with my collection of swatches before the end of March.
How about you? Do you keep your gauge swatches? If so, why? And what do you do with them? If you don't keep them, have you ever regretted it?
Monday, February 25, 2008
Electric Mixer Yarn Ball Winder

Got a lot of yarn to wind and not enough bicep power? Try one of these relatively inexpensive Do It Yourself methods, The Electric Mixer Yarn Ball Winder.
Fig and Plum's Hand Mixer Method
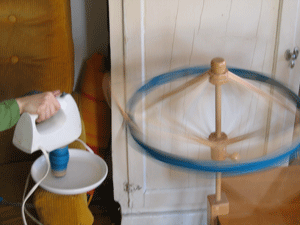

..and for the ultra adventurous Do It Yourselfers

Friday, February 22, 2008
What's in the Medicine Cabinet?

It's Friday already! And I'll go with what's been high up on my last this past week - the medicine cabinet. Here in the northeast US, the flu is sweeping across the region. It hit my house - particularly me - last week. As the mom of 4, I hate having to drag a sick kid to the drugstore, or maybe worse - a sick me and 4 kids, so I try to keep my cabinet stocked; here's a few tips for you to do the same.
- Go thru your medicines regularly and check for expirations. From my understanding, expired meds won't make you sick, they just won't make you well; they lose their potency. Throw out your expired meds, whether prescriptions or over-the-counter. I suggest you do this at the beginning of each "season" - allergy, cold, flu, sunburn.
- Re-stock - now while everyone's healthy. Get pain reliever/fever reducer for everyone in your household (adult, kids, infants), cold medicine, something for flu symptoms, ginger ale, PediaLyte, whatever it is you use when you are sick.
- If there are kids in your house, make sure all of these are put up some where safe from their curious hands.
Simple enough, right? Now, just sick back and cross your fingers and hope you won't have to use any of it.
Happy Friday!
Thursday, February 21, 2008
Condensing Magazine Patterns & Articles
 We begin our organizing adventure today with just that - beginning! Like me I'm sure that you have every intention of getting organized. You might have even planned what you would like to organize, but as the week progresses suddenly you realize it's Thursday again and you haven't organized a thing!! Well, that was almost me. I actually did do some organizing this week, but failed to organize my patterns, if you can believe that. I organized my spice cabinet and a utility shelf (which I failed to take pictures of) in my laundry room.
So, today I attempted to organize part of my desk, which meant also pulling out the stack of magazines that I had stacked on my stash shelf.
 After pulling out this stack of saved magazines I realized I needed to reduce more than just my knitting magazines. I didn't tackle all of the magazines because I hadn't purchased enough 3-ring binders or page protectors, but I did tear out the patterns from my Interweave magazines and my Family Handyman mags that I wanted to keep. I've decided to donate my Family Fun magazines to our local MOMS Club, and I will save the articles from Working Mother that I like.
As you can see, this side of my desk is in shambles. It's been this way for years. I clean my desk, but never really organize it so things just end up back the way they were rather quickly. My biggest problem is paper and keeping up with the slew of bills that need to be organized daily.
 In this picture you can also see binder which are no longer in use and a few that have not been in use for at least a year or more.
So, what did I do with all this stuff? I threw it all on my bed and sorted it.
 Even though I do have a drawer for bills, I simply sorted the ones that were laying on my desk and that were stuffed into the slots that you see, into a box that I will need to sort through later because some of the bill can seriously be thrown away. All the books I put in the bookshelf that is in my livingroom and the rest of the stuff got sorted into a box for my husband to go through.
The end result is rather nice. I even have some empty space with with to buy a few more
 binders to sort the other magazine 'keepers' into. I still have yet to actually put titles to my binders, but I'll work on that a little later today.
Wednesday, February 20, 2008
Go Vertical
 Go Vertical. That's my message for the week.
As you look around at what you have and try to work out ways to store it, think upward. Use shelves - they come in all sizes with a "footprint" that can be fit almost anywhere. Use hooks in singles or in groups. Use skirthangers. Mount shelves over a doorway - move stuff up there you don't use, and then put your knitting stuff where it is accessible.
One part of the solution, at least for me, is to arrange things so that they are visible. "Out of sight, out of mind" is too true.
This leads to a slight subject detour - the 30-day challenge. I have accepted it, and am working diligently to get my stash organized. It's a slow process for me, but it is happening. I've put all my WIPs in one place - my bedroom, for now, in a pile that blocks my dresser. I have been separating out "assigned" yarn (which is slated to be used for a specific project) and "free-range" yarn which has not yet been assigned a project. The good news is that I have a lot less free-range yarn than I thought, which makes this challenge a little easier to complete.
I'll have pictures for next week. In the meantime, if any of you have pictures of successful vertical storage, please share!
Tuesday, February 19, 2008
Organizing the WiPs

When I look at my stash -- which I wish I could say was beautifully organized, but that would be a bit of a lie -- I realize that one of my obstacles is dealing with the works in progress (WiPs). Recently I finished a project (Quant, from Knitty) and realized I didn't know what I was going to work on next. Now, I have no shortage of WiPs, but most are what I would call abandoned projects. And they're tucked away in the Kangaroom purse organizer that I mentioned in last week's post. It's going to be awhile before I feel like working on those projects again.
So when I ran out of things I wanted to knit, I went through my pattern notebook and found a sweater and a poncho that I wanted to make. I then started on the delicious process of deciding on yarn and color and actually finding and purchasing the yarn. So now I've started the projects and the yarn's just sitting in shopping bags on top of my stash cubes. I'm all about form over function, but that' just plain ugly.

When I started looking at things, I realized that I have some other WiPs that I wouldn't consider abandoned. And they're basically cluttering up my stash cubes as well. So what's the solution? One method that's worked well for a long, long-term project (Barbara Walker's Learn-to-Knit Afghan, for which I'll eventually knit 63 eight-by-eight squares in 63 different stitch patterns) is to store the completed squares in a large pop-up cube and the square-in-progress in a bag. I use a cosmetics case for this project, one that I purchased from Target. It holds a ball or two of yarn, the square in progress on the needles, the pattern book, and stitch markers. Here it is.


So I thought I'd adapt that idea by storing my WiPs that I'm actually working on (or might be working on soon) in knitting bags. That way, I can just grab the bag for the project I want to work on. So I emptied the unsightly plastic grocery bags and put the projects into the various and sundry bags I had on hand. I added hand-written tags to identify the project contained in each bag. Then I lined them up for a photo. It's sort of a motley looking group of bags, but it's organized and not too ugly!

It occurs to me that I nice coat tree might store the WiP bags nicely. A sweater organizer would do the trick, too, if I had rod space in my closet for it. Or a book shelf would work. Right now, floor space is what I have, so there the bags rest.
What about you? How do you store your works in progress?
Monday, February 18, 2008
Essential Knitting Bag Items


Here are some
 items that I
 regularly carry in my knitting bag.
- Tape Measure

- Calculator
- Needle Gauge
- Stitch Holders
- Cable Needles
- Safety Pins
- Small Rubberbands or 9.0mm Jump Rings or beaded stitch markers
- Row Counter
- Needlepoint Protectors
Finishing - Clover Chibi Blunt Tapestry Needles
- US F/5 3.75mm Crochet Hook; great for picking up dropped stitches, seaming or binding off.
- Child's Blunt Tip Scissors
Reference Materials
- The Knitter's Handbook by XRX Knitter's Magazine

- The Crocheter's Companion by Nancy Brown
Bookmarking
- Notepad
- Pen/Pencil
- Highlighter
- 3M Sticky Notes
- 3M Post It Durable Index Tabs
Friday, February 15, 2008
$10,000 for the Messiest Office Contest
Do you think that you have the messiest office? If you can prove it with a picture or a video you just may win $10,000 or one of the lessor $5,000 prizes. It would be awesome if one of our readers won. Hurry ~ the deadline is February 25th!
Organizing your Closet
 Happy Friday! It’s a long holiday weekend (for those who get President’s Day off on Monday) so I thought it would be a good time for a long project. This week, we’ll begin filtering through all those clothes, shoes, hats, scarves, and jackets in your closet and creating some order. You’ve gained weight, lost weight, changed your style – but all those old clothes are still hanging there. So here we go – let’s start with hanging clothes.
 Pull everything out off the hanging bars in your closet if you have the time to do this all at once. I know Flylady doesn’t like this approach, so if you are a loyalist to her method or feel overwhelmed by the idea of spending an hour or two going through your closet, then do what you can get thru in 15 minutes or just a portion of your closet.
Go through each piece of clothing and evaluate it – does it fit? Do you like it? Is it still in style? Is it in good shape?
If the answer to these questions is YES, hang it back up and place it back in your closet.
Consider if you have a preference for plastic or wood hangers, instead of the dry cleaner wire hangers. Some folks feel that the plastic and wood hold clothes’ shape better. This can also be an economical decision, evaluate whether you can afford to purchase as many hangers as you would need for your clothes.
Hang your clothes in categories, like at the department store. Pants together, shirts, blouses, sweaters. For your sweaters, consider folding them and hanging them over the bar of the hanger rather than by the shoulders, the way they come back from a drycleaner, so as not to pull on the shoulders. I also hang my clothes by color (all white button shirts, black sweaters, pink blouses, slacks, jeans, etc.) so that I can quickly find what I’m looking for.
If you answered NO to the questions above – you have to make some decisions about what to do with it. If you are losing weight – here’s a weight-loss tip a few years ago – once you have lost gone down a clothing size, get rid of that larger size clothes so you don’t have a safe haven to go back to. If you are gaining weight, but hope to return to your smaller size, pull those clothes out for now so you don’t get frustrated by those little clothes and pile them aside. Of course, if you are going thru a temporary size gain – pregnancy for instance, this probably isn’t the time to worry about this, just think about style. If anything needs repair, decide if you are really going to sew on that button or fix that zipper; if so, make another pile. If not, put it in a discard pile. (In some areas, the recycling centers and/or animal shelters will take fabric so you can look into that if you are interested in recycling your unwearables.) Lastly, if you just don’t like it, but its wearable, put it into a donation pile.
So now you have 4 areas – closet, discard/recycle, repair, donate. And “smaller size” for those working to lose weight and get back into that old size. All your clothes should end up in one of these piles.
(Some of you have multiple closets and can switch for the seasons. I don’t, all my clothes are in one closet – but I do rotate them for the season. Right now, all my winter clothes are in the front of my closet and summer is in the back. Later in the spring, I’ll go thru this same process with my summer clothes as I move them up to the front.)
Repeat these steps for the remaining areas or another 15 minutes, as your schedule allows. Then step back and look at your wonderfully ordered closet.
And those piles you made? Bag/box them now for donations and discard/recycling. Find places for them to go and make an appointment with yourself to get rid of them within a week. The repair pile – make an appointment with you, your sewing box, and your pile of clothes to get them done.
Moms – you also have the added chore of going through your kids clothes. Here’s a tip for your donations pile – identify friends who want your kids’ hand-me-down clothes, I don’t think anyone gets offended if you ask. As you go through your children’s clothes, place a bag labeled with each recipient’s name and place the clothes in the bag as you go along. When you are done, call them and arrange to get the bag to them.
Have fun!
Thursday, February 14, 2008
Thursday Patterns
 This week I'm going to talk a little bit about storing fabric patterns. Because many of us who knit also sew I felt like this is an area that needs to be discussed. I, myself, separate my knitting supplies from my sewing supplies, but in any case, organizing one area will hopefully help us to organize other areas of our craft life.
On the Ravelry forum I shared my current method of storing my patterns.
I purchased a little Mobile Work Center from Wal-Mart a couple of years ago to store some of my sewing supplies as well as the patterns that I've collected. I don't have a lot of patterns right now, so this method has been good to me.

I'm able to store my sewing machine supplies, thread, and other little doo-dads in the work center. As you can see, right below the tray is where I keep my patterns. What I've done with many of my patterns because I can never fold them the same way they came out of the package is to place the pattern and package inside of a ziplock bag.
I wanted to highlight some of the other storage options that I've found while searching the net that I thought would work well.
Sue's Pattern Pockets
Each 3-ring page contains a smaller pocket to store the pattern package while the rest of the page is used as a storage for the pattern itself.

 Sterlite 4-Drawer Carts
If you have more patterns then you want sitting on a bookshelf another option would be to put
 them in these clear drawers. You can separate your patterns by type and by size if you have more than one of the same pattern.
If you decide to tackle your patterns this week I've love for you to come back here and share what has worked best for you.
Wednesday, February 13, 2008
It's Like Playing Dominos

This Club has got me working! I accepted the 30-day Challenge and have started organizing my yarn. I shifted, dug, and unearthed 43 WIPs, entered them into a spreadsheet, and then relocated them, temporarily, into my bedroom. This is not the greatest picture, but as you can see, there's a lot of knitting that needs to be done.
What does this have to do with Organized Space? Well, once the projects were out of the way, there was more room to access and assess the rest of my stash and the space used to store it, and I can now consider how I am going to rearrange and declutter.
My next yarn-related task will be to ferret out all the yarn that I have bought for a specific project and isolate it along with its pattern. This group will join the WIP group in my bedroom, in its own pile to keep it separate, and will give me even more space to work in. I plan to shift around furniture, and set up a cozy knitting nook with proper lighting and a comfortable chair, not to mention relocating the computer and printer closer to the telephone outlet and plugs, after I move the 6-ft long cabinet that's against the wall.
 project and isolate it along with its pattern. This group will join the WIP group in my bedroom, in its own pile to keep it separate, and will give me even more space to work in. I plan to shift around furniture, and set up a cozy knitting nook with proper lighting and a comfortable chair, not to mention relocating the computer and printer closer to the telephone outlet and plugs, after I move the 6-ft long cabinet that's against the wall.
This whole process involves a series of related steps. Once I started on the first one (WIP identification and relocation), the next one fell into place. Because I knew my overall goal, I could break the process down into babysteps (Flylady, I'm over here) that are manageable.
So I encourage you to look at your space, figure out what you want as an end result, and then work backwards from there to formulate a plan. Obviously, we're all here to help with encouragement and with suggestions.
Tuesday, February 12, 2008
Where to store that stash

Last week, I talked about the steps involved in sorting out your stash (figuring out how you use it and therefore how you should organize it), then sorting and purging. Once you've accomplished that, you're ready to make some decisions about how to store all the yarn you saved. In last week's post, I cautioned you not to buy storage until after you've sorted and purged, so that you'll buy appropriate containers.
But once you've decided how you want to organize your yarn, you've sorted and purged your stash, and you know the sizes of containers you need for each category of yarn, you can move on to the fun part: buying containers. (At least that's my idea of a good time.)
What containers should you buy? It depends on your aestethic, on your space, and, of course, on what you're trying to store. So I'll run through some options here.
Personally, at the moment I use pop-up cloth storage cubes. I got them at Home Goods for $10 for a package of six (two each of three different sizes). They're not gorgeous, but they're functional. Here's a photo of one of the cubes, the one that contains my worsted weight yarn. Since I have so much Cascade 220, I put all it on the bottom of the cube and put a file folder on top of the Cascade 220 to separate it from the rest of the worsted.

To label the cubes, I use old-fashioned wooden clothespins with labels attached. (I use my handy Brother PTouch labelmaker for the labels.) I like this method because I can easily move the clothespin if I put that category of yarn in another container. Here's a close-up of the labels for the worsted container. There are two clothespins on the cube because there are two categories in it.

I also have small categories of yarn in my stash that are types, rather than weights, of yarn. I store them in plastic kitchen canisters on a bookshelf in my craft room.

So that's how I do it. You can probably tell that I value function over form. And that I don't have a gigantic stash. If you're more into things looking great, there are still lots of options. Here are a few favorites.
I happen to own this purse organizer from Kangaroom. I use it for works in progress and for other random things, but it could definitely be used to hold stash. In fact, Kangaroom now markets it that way. They're calling it a "hanging yarn organizer." You can find the description here:

Sweater organizers are great, too. Like the Kangaroom yarn organizer, these organizers typically are made to hang over the rod of a closet. So if you have a spare closet with some rod space, you can set up a nice system. Here's one from the Container Store that I like. It's translucent, so you can see the colors from all sides.
If closet space is at a premium, you could even buy a rolling garment rack to hang these organizers on. If dust is an issue, get one with a cover, like Shae shared with us in the OKC discussion boards at Ravelry. Over at Lowe's, they call this a "portable closet".

Getting away from organizers, there's the wire cube option, which Dulcedosa recommended in the OKC discussion boards on Ravelry.
 Then there's furniture. Any type of chest or drawers or dresser or cabinet can be converted into a fabulous yarn-storage system. In my opinion, labels are crucial to keep items stored out of sight straight. If you can't stand the look on the label on the outside of a drawer, consider putting in on the top edge of the drawer, visible only when you open the drawer. You can repurpose a piece of furniture or find one cheaply at a flea market or yard sale.
Of course, plastic bins work well and many people store their yarn in zip-top plastic bags. Those tend to not stack very easily, so may not be space efficient. But they're a great way to separate categories within another type of container.
These are just a few ideas. I'll share more later. If you store your yarn in different ways, please feel free to share your stash storage solutions in the comments!
Monday, February 11, 2008
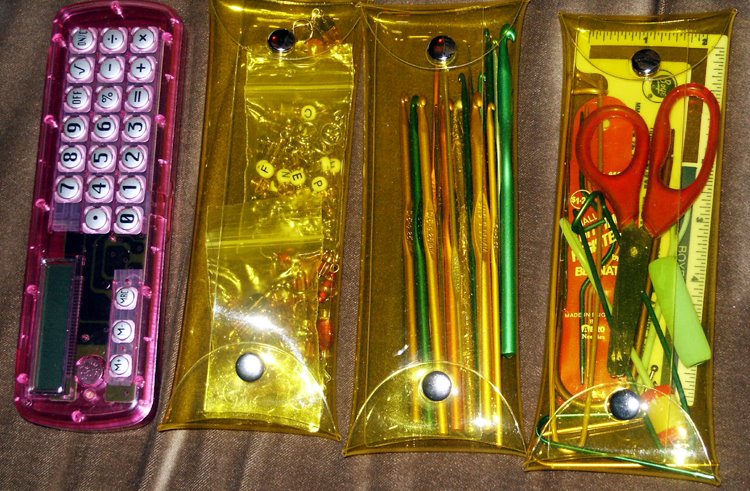
The Splash Pencil Case
 Browsing around Walgreens drugstore the other night, I stumbled across these cool little "Splash Pencil Cases". At first, I didn't know what I would do with them besides the obvious, but I bought everyone that they had. Standing in the checkout line, it dawned on me that I could adopt these to hold my crochet hooks, double pointed needles, stitch markers, cable needles and various other sundries. Made from heavy gauge vinyl with heavy duty snaps on both end and measuring 9 in. x 3 in., these cases are functional, transparent, durable and come in a variety of colors like pink, yellow, orange and blue.
Of course, I had to buy the pink calculator pencil case, too.
Stay tuned for the DIY version, where I'll post a template and supply list with detailed directions on how to make a similar case.
Thursday, February 7, 2008
Happy Friday!
 I'm Frances and on Fridays, we'll be working to get our non-yarn lives organized. I think my fellow columnists/blogger Suzanne said it best, "I'm organized, but I'm not neat". Thus, there's piles of laundry on my living room floor, but they are organized stacks for each person in the household, by which drawer or closet they go into. Speaking of my household - I'm a wife and stay-at-home mom of 4 little people. ("Stay-at-home" is a misnomer because I am rarely at home, so you will see that some of my articles will be about being organized on the go, but I guess its better than "unemployed", sounds more modern than "homemaker", and is less likely to offend than "full-time mom".) When hubby and the kids allow, I enjoy reading, scrapbooking, crocheting, and cooking. I have space in Ravelry.com, am a Creative Memories Consultant and have a scrap website - www.love2scrap.ning.com, sometimes blog at http://slackermomof4.blogspot.com and coordinate 2 bookclubs (plus my daughter's newly formed one), am a PTA officer, and active in my community. I'm sure you could run down your list of what you do and who you are and we'd see that we are all busy folks trying to keep hold of our sanity. Hopefully, I'll be helpful in that. And, please, feel free to share with me your ideas, suggestions, and questions and I will do my best to follow up.
*****************
With intros done, let's begin. Let's first talk about that infamous "to-do" list. I know, there are list people and not list people. I'm talking to the list people, because frankly, I don't know how the non-list people function, I need a list to go upstairs and return with what I went up there for, though I think that has more to do with those brain cells one loses in pregnancy rather than being unorganized, but that's another conversation - back to our list. I used to write my list with all the things I needed to do in the forseeable future, then at the end of the day find that I have crossed off 2 of the 37 things on the list because it was just to overwhelming. But my new system is to write a shorter list - only 10 items, no more, possibly less - for the day. Preferably, I make the list the night before so I can start the morning off just thinking about making a cup of coffee. Ten seemed like a good, popular number so I use 10, perhaps you need a few more, but let's say 15 is a limit. Put the things that have to be done on that day, and when you get to 10 (or 15) stop. Go to the post office, get cash, drop off cookies to school. If you have more to do - figure out what can go on the next day's list, juggle stuff around, even start a list for the week if you need to plan that way, but don't put more than 10 on a day's list.
The list includes the big things (pay mortgage) and the little things (sew button on J's shirt). And the little things, I really try to make sure I do because those are usually the ones important to my little people and isn't that the whole point of parenthood? So yes, get paint off doll, sew teddy's nose back on, and pick up newspaper for school project is on the list along with file tax assessment and make bank deposit. In fact, when I feel very busy and that I may overlook an important person, I make it a point to put one item on the list for each person in the family. If someone doesn't have an immediate need, then I ask if there's something they want on the list (can be fun!)
My list for today? Send get well card to S.; drop off coffee mugs to St Johns; wrap baby blanket (gift); p/u diapers and breakfast for C.; make snacks for girls' bookclub; make brownies and drinks for crop; get babysitter for Sunday. Not 10 things yet, but probably by the morning. And I feel like I can get these things done because its only 10 and I've got all day!
Try it, let me know how it works for you. Happy Friday!
Knitting Patterns - What to do with them!

I am probably the most unorganized of this group of writers. I need lots and lots of help! But, don't we all feel the same way? I tend to see lots of patterns online that I like and want to eventually get to, so I bookmark the patterns and usually it's out of sight out of mind. The other thing that I tend to do is when I have a particular project in mind I search Knitty.com or Ravelry for the perfect pattern. I print the pattern out and put it in my project bag with all the supplies that I need for that project. What do I do when I want to do that project again later down the road? I print the pattern out again! Yes, I know, it's insanity! Such a waste of paper!
While perusing the forums of The Organized Knitting Club on Ravelry I've noticed that many of you have different methods to savings those treasured patterns. Some of the top methods mentioned were -
- Bookmarking the pattern site
- Printing the pattern and keeping in a notebook
- Printing the pattern and putting it in a bag with yarn for the project
Step One
Start a 3-ring binder with tabs in alphabetical order. Fill with plastic page-protector sleeves. As you print out the patterns that you'd be interested in knitting, stick them in the appropriate
 section in your notebook. If you have a lot of patterns you might have to use one notebook per category. If there are patterns which you find yourself knitting often you might want to place those patterns in their own special section in the front of the notebook.
Step Two
What about all those knitting magazines that you have laying around? This is a tip that I learned from Martha Stewart: After 6 months or so tear the patterns out of the magazines which you would like to keep and file them with your other patterns in the 3-ring binders. From there you can either toss the old magazines, or better yet, donate the magazines to your nearest elementary school.
Next week I'll share about sewing pattern storage and display my attempts at organizing my knitting patterns.
Subscribe to:
Comments (Atom)